
How to Create Effective WhatsApp Campaigns with Spellty Campaigns

Spellty is a marketing platform for WhatsApp, and soon for other channels like email and SMS. It allows you to quickly reach your audience and create demand through interactions with all the functional power that WhatsApp templates offer. Send campaigns using buttons, files, images, or videos, or be disruptive in your industry by sending WhatsApp Flow forms that dramatically enhance the user experience to gather key business process information without relying on a boring bot that collects information question by question.
Key Features Offered by Spellty Campaigns
- Campaign scheduling
- Dashboard and granular campaign sending reports
- Contact directory
- Campaign management in Spellty
- Template creation from the Spellty configuration portal
- Campaign creation and segmentation with Spellty
Contact Directory
The contact directory in Spellty displays a detailed list of contacts interacted with through campaigns or communication flows. The table presents several columns with relevant information about each contact:
- Name: The full name of the contact (e.g., Tiffany Roberts, Emma Howard, etc.).
- Contact mobile: The contact’s mobile phone number with country code (e.g., +14155551267).
- Email: The contact’s email address (e.g., tiffanyr@example.com).
- Address: The physical address associated with the contact (e.g., 345 Birchcrest Lane, Baltimore, MD).
- Tags: Tags that categorize the contact based on the type of relationship or interest (e.g., “leads,” indicating they are prospects or potential clients).
- Other optional contact information fields.
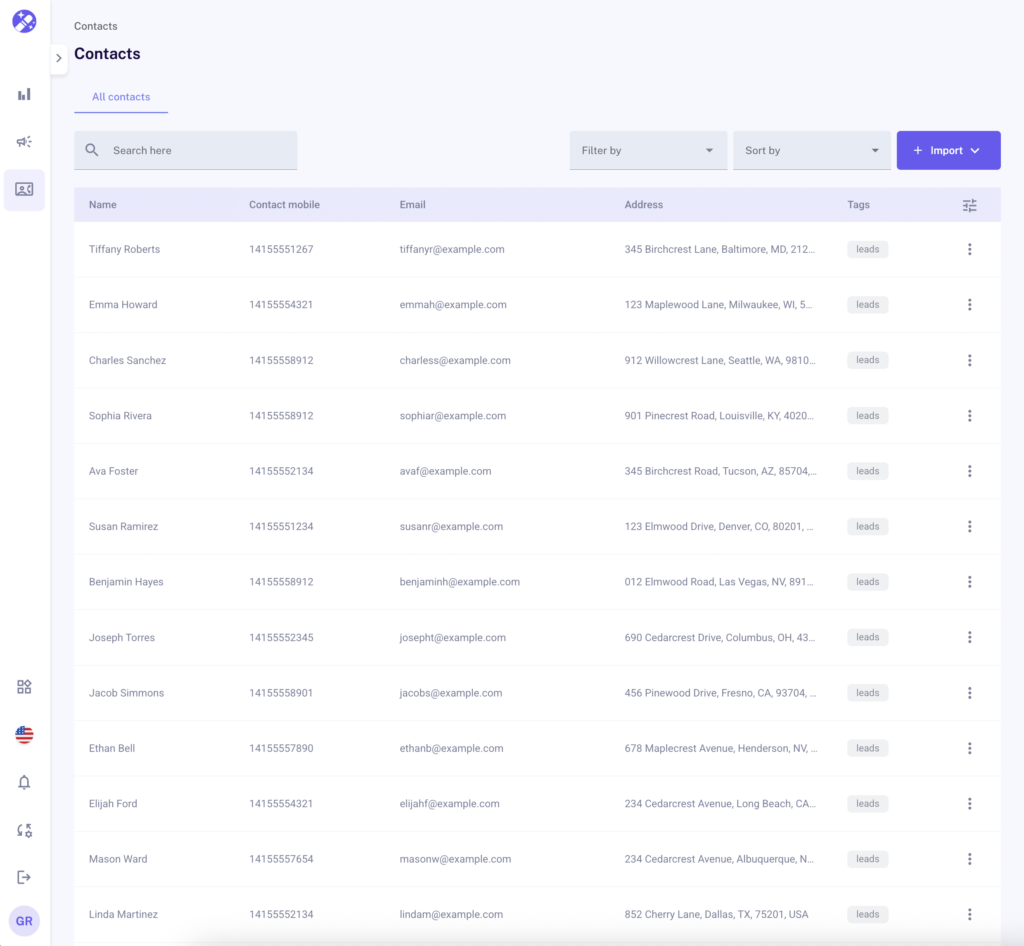
Filter and Sort Options:
• Filter by: Allows filtering contacts based on certain criteria (e.g., “leads “).
• Sort by: Allows sorting contacts based on different parameters, such as name, phone number, or address.
• Import: Allows importing contacts from other sources, such as CSV files or external databases.
Additionally, you can access more details or perform actions on each contact by clicking the three-dot icon “... ” in the actions column, which allows you to edit or manage each entry individually.
This directory is useful for managing and segmenting contacts based on different parameters and facilitating efficient communication through Spellty channels.
Campaign Management in Spellty
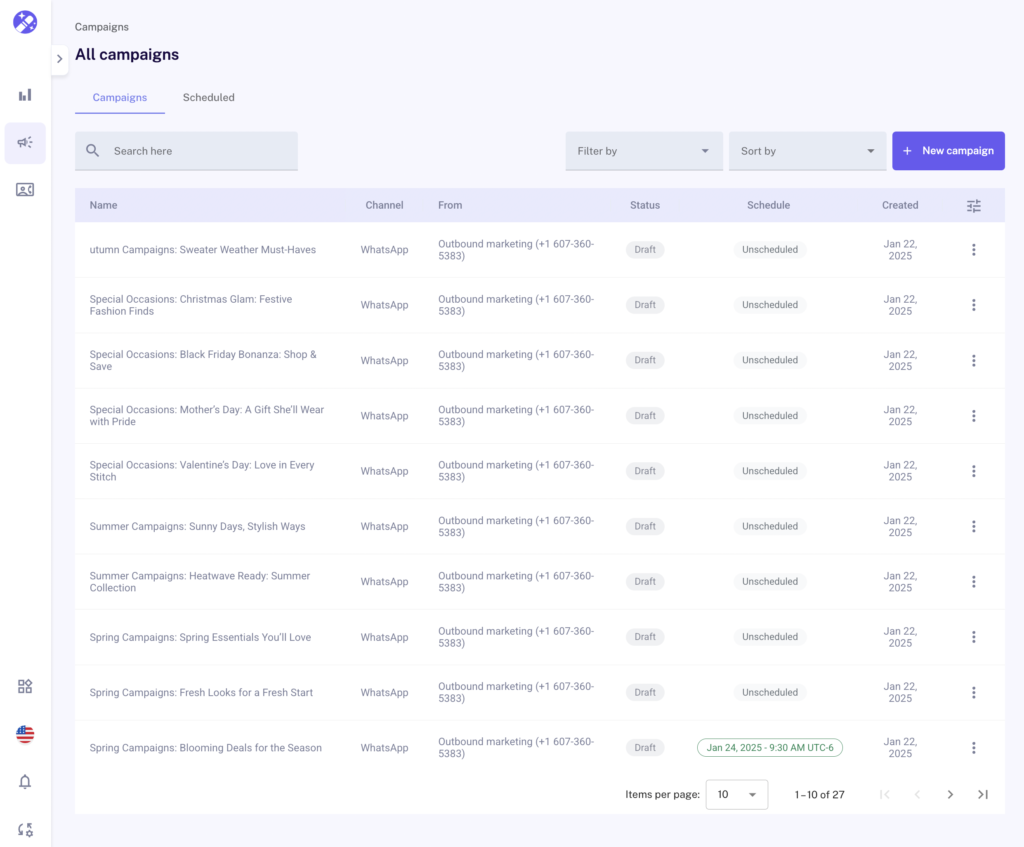
The campaign management panel in Spellty allows you to create, organize, and track all messaging campaigns. This tool provides full control over the campaigns, from their creation to scheduling and tracking. Below are the key components of this panel:
Campaign Panel Components
- Campaign name: Each campaign is identified by a name that reflects its purpose or theme, making it easier to organize and search within the platform.
- Channel: Displays the channel used for the campaign, such as WhatsApp or any other available channel on the platform. This allows managing campaigns by communication channel.
- From: Indicates the source of the campaign, such as the name of the account or team running the campaign. This helps identify who is in charge of the campaign.
- Status: The status of each campaign indicates whether it is in draft, scheduled, or sent. This allows you to know the stage each campaign is in and facilitates managing its progress.
- Scheduled: This column shows whether the campaign is scheduled to be sent on a future date or if it does not have a set schedule. This is essential for planning message sends at strategic times.
- Creation date: Displays the date the campaign was created, helping to track campaigns chronologically.
Management and Analysis Options
• Filters and sorting: You can filter campaigns by different criteria and sort them by name, status, or creation date, making it easier to organize and search for specific campaigns.
• Create new campaign: The “New campaign” button allows you to start creating a campaign from scratch, providing options to customize and schedule it.
• Scheduling and details: You can view details about the send time and the total number of campaigns in the panel. This allows you to manage multiple campaigns efficiently and ensure they are properly scheduled and organized.
In each campaign, there is a “... ” options menu that allows you to perform several actions:
- Delete: If a campaign is no longer needed, you can easily delete it. This option lets you manage unwanted campaigns without complications.
- Insights: By selecting this option, you can access detailed performance reports about the campaign. This includes me
- trics such as the number of messages sent, delivered, and read, allowing you to make adjustments based on the results.
“Spellty Campaigns has really helped simplify our process for managing WhatsApp templates. The platform is easy to use and allows us to quickly create and customize templates without feeling overwhelmed. It’s been a small but valuable improvement for our communication efforts, and we’re grateful for the simplicity it brings”
Elena Márquez
Creation of WhatsApp templates from the Spellty portal configuration
The WhatsApp templates used in Spellty Campaigns are typically created and managed through Meta’s official website on Facebook Business. However, to enhance the user experience, Spellty offers the same functionalities within the configuration portal at https://portal.spellty.com/, allowing you to manage the templates directly without having to navigate the Facebook platform, which can be complex for those not familiar with Meta’s interface.
Steps to manage Meta templates in Spellty
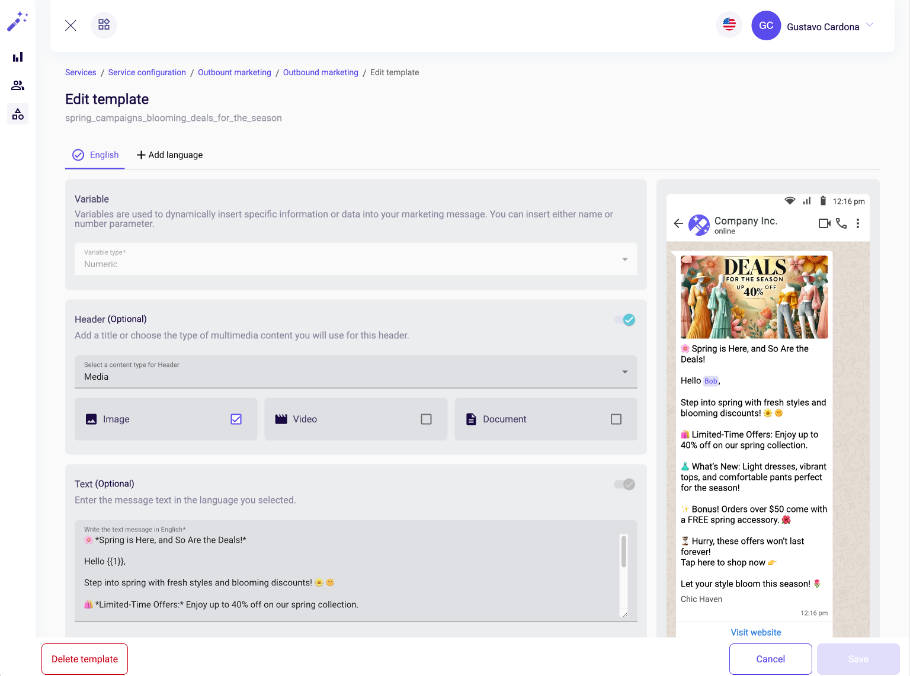
Create or edit the template:
From here, you can create a new template or edit an existing one. You can add multimedia content, such as images or videos, and insert custom variables, such as the recipient’s name.
Access the portal: Go to https://portal.spellty.com/.
Select the Services option: In the left-hand menu, click on “Services” to manage campaign configurations.
Choose the service instance: Select the Spellty Campaigns instance (or any other instance you want to edit).
Select the Channels option:
Inside the service configuration, click on “Channels” to manage communication channels.
Select the WhatsApp channel: From the list of available channels, select the WhatsApp channel you want to use for the campaign.
Click on Templates: In the channel configuration, select the “Templates” tab to view, create, or edit WhatsApp templates.
Creation and Segmentation of Campaigns with Spellty
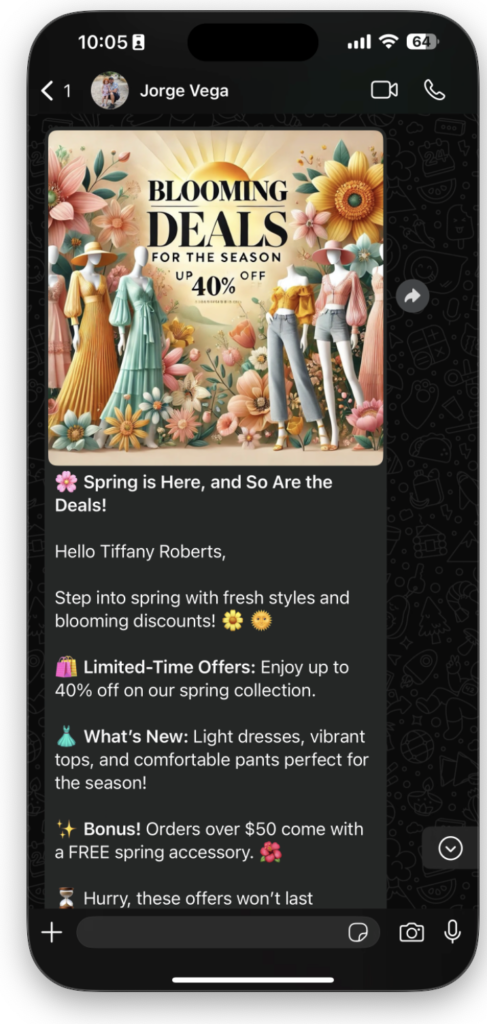
Creating WhatsApp campaigns with Spellty is simple. Imagine you want to engage your customers with multimedia messages (images, videos), include call-to-actions (CTAs) and forms within the message, while integrating personalized information such as their name, monthly consumption, and contract details. Spellty allows you to combine these elements effectively to improve engagement and create more impactful campaigns.
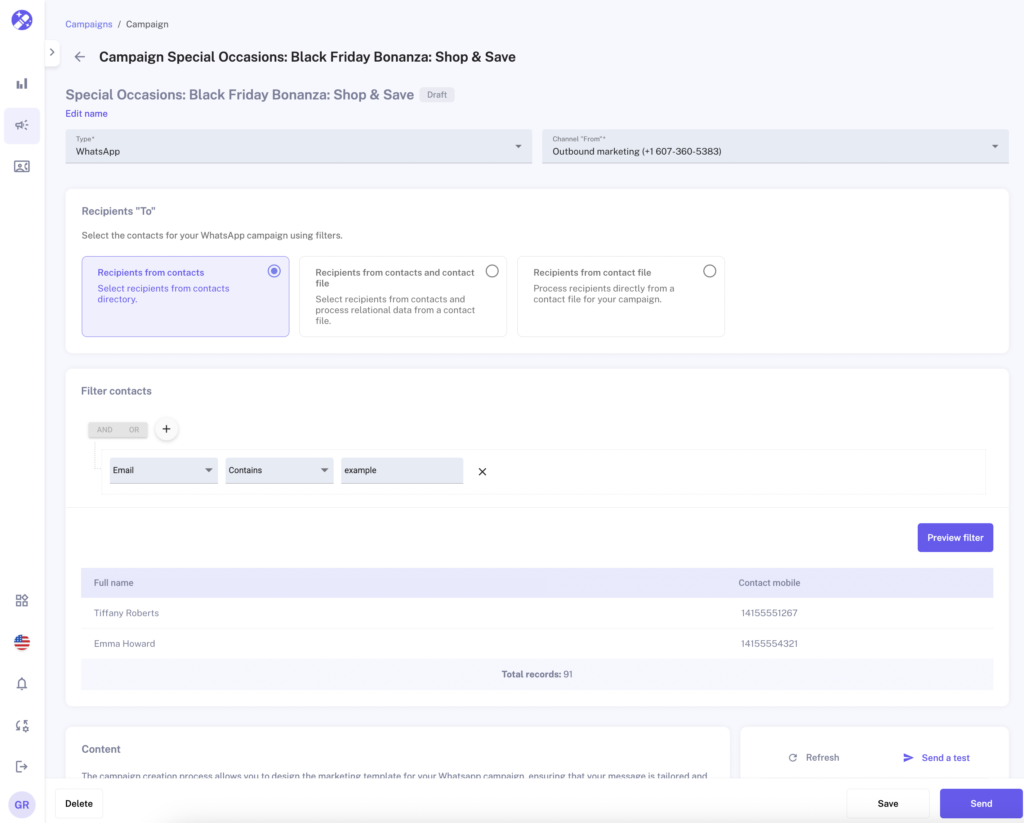
Spellty offers three options to select the recipients of your campaigns, adapting to different segmentation and personalization needs:
- Recipients from contacts: Select recipients directly from Spellty’s contact directory.
- Recipients from contacts and contact file: Combine information from your directory with additional data from a CSV file to further personalize your messages.
- Recipients from contact file: Perform a quick send by uploading a CSV or XLS file with the recipients, without the need to segment.
1. Recipients from contacts
This option allows you to select recipients directly from the contact directory stored on the Spellty platform. It’s ideal when you only need to use basic information, such as name, phone number, email, etc.
Recipient selection process:
- Access the recipients section: In the WhatsApp campaign, under the Recipients “To” section, select Recipients from contacts.
- Filter contacts: You can apply filters, such as email, phone number, etc., to segment the recipients you want to include in your campaign.
- Preview and confirmation: After applying the filters, you can preview the selected contacts before sending the campaign.
- Send the campaign: Once the recipients are confirmed, personalize the message and proceed to send the campaign.
2. Recipients from contacts and contact file
With this option, you can combine Spellty’s contact directory data with additional information from an external file, such as a CSV file. This feature is perfect when you need to integrate both static information (like name and phone number) and dynamic information (like monthly consumption or contract number) into the same message.
Recipient selection process:
- Select the recipients option:
In the Recipients “To” section, choose Recipients from contacts and contact file. - Upload CSV file:
You can upload a CSV file with additional data. This information will be automatically combined with the contacts in Spellty’s directory. - Filter and customize:
Apply filters and select the data fields you want to use in your message. You can also map the fields from the CSV file to the template fields to further personalize the message. - Preview and send:
Review the preview of the combined contacts and data, then personalize the message and proceed to send the campaign.
3. Recipients from contact file
This option allows for a quick send of marketing campaigns by directly selecting recipients from a CSV or XLS file. There’s no need to use Spellty’s contact directory or segment the database. This option is useful when you have an updated file with all the necessary information.
Recipient selection process:
- Select the recipients option:
In the Recipients “To” section, select Recipients from contact file. - Upload CSV or XLS file:
Upload the file that contains the contacts you want to send the campaign to. No further segmentation is required, all contacts in the file will receive the message. - Send the campaign:
Once the file is uploaded, personalize the message and proceed to send the campaign quickly and directly, with no additional complications.
Campaign Scheduling with Spellty
Campaign scheduling in Spellty is an intuitive and flexible process that allows you to effectively plan and manage WhatsApp campaign deliveries. Below, we explain how to schedule campaigns, use the interface to define the date and time, and how to combine it with recipient segmentation.
1. Schedule a Campaign
Steps to schedule a campaign:
- Access the campaign creation interface:
To start, go to the Campaigns panel on the Spellty platform and select the “New campaign” option to create a campaign from scratch. - Select the channel:
In the campaign creation interface, select the communication channel (in this case, WhatsApp) from the Channel field so that the campaign is sent via WhatsApp. - Define the recipients:
In the Recipients “To” section, select how you want to obtain the contacts:- Recipients from contacts: Select contacts from the Spellty directory.
- Recipients from contacts and contact file: Combine information from the contact directory with additional data uploaded from a CSV file.
- Recipients from contact file: Use only a CSV file to upload the contacts.
- Apply filters:
If you need to segment the recipients, you can apply filters on data fields (e.g., email, phone number, etc.) to further personalize your selection.
2. Create Campaign Content
Steps to personalize the content:
- Select or create the content: In the Content section, you can choose a previously created template or create a new one. You can include images, videos, and other multimedia elements.
- Link additional data: If you selected Recipients from contacts and contact file, you can link additional data from the CSV or XLS file. This option allows you to incorporate dynamic information into the message, such as monthly consumption, contract number, etc.
You can “bind” this data into the message using variables (e.g., {name}, {amount}, etc.). - Upload a header image: Add a header image to further personalize your campaign. Drag and drop files from your computer.
- Map contact fields: If you’re using additional information from a CSV file, make sure to map the file fields to the template fields to ensure the data combines correctly.
3. Scheduling Date and Time
Steps to define the scheduling:
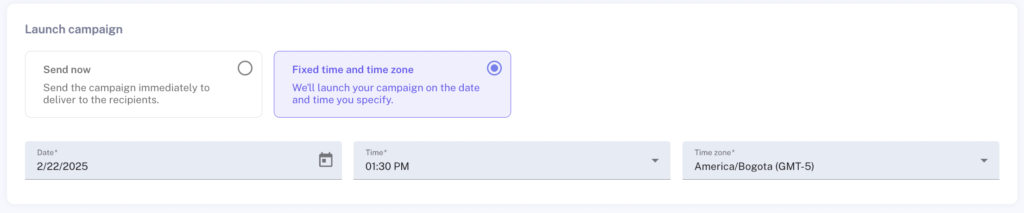
- Define the send date and time:
In the Launch Campaign section, you can schedule when you want the campaign to be sent.- You can choose a specific date and time for the campaign to be sent automatically at the selected time.
- The “Fixed time and time zone” option allows you to set the exact time zone for sending to ensure the messages are sent at the desired time, regardless of the user’s location.
- Confirmation of scheduling:
Once you select the date and time, the system will show the scheduling and the campaign status (draft, scheduled, etc.).
4. Review and Send
Final steps for sending:
- Review the campaign: Before launching the campaign, make sure to review all the details: recipients, content, and scheduling.
- Send the campaign: If everything is correct, you can send the campaign immediately or leave it scheduled to be sent in the future.
Benefits of Campaign Scheduling with Spellty
- Automation: Automates the sending process, allowing you to reach your audience at the right time without manual intervention.
- Advanced personalization: You can combine static and dynamic data to send more personalized and effective messages.
- Efficient segmentation: Precisely segment your recipients with filters and external files, improving the relevance of the messages.
- Flexibility: Define the exact send date and time to adapt to different time zones and marketing strategies.
Campaign scheduling in Spellty gives you full control over the timing of delivery and message personalization, significantly improving the effectiveness of your WhatsApp campaigns.
Scheduled Campaign Viewer in Spellty
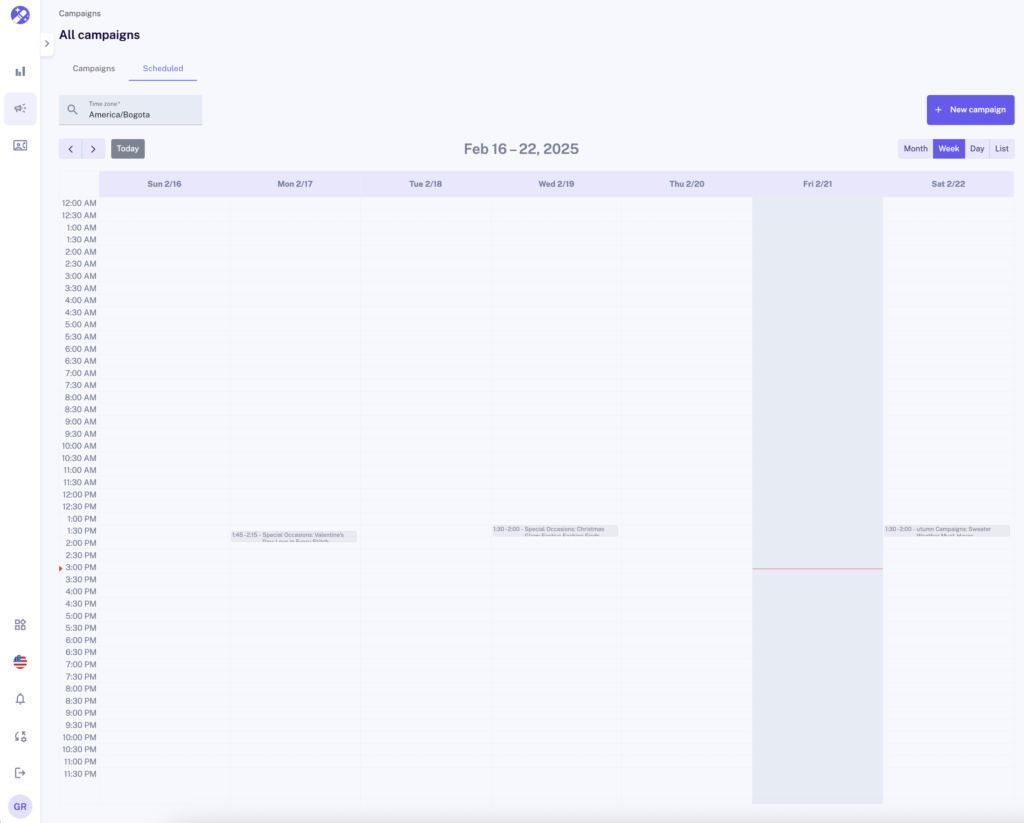
The scheduled campaign viewer in Spellty allows users to easily manage and view WhatsApp campaigns planned or future delivery. This viewer is designed in a calendar format, allowing users to view and organize campaigns by the scheduled date and time.
Main Features of the Campaign Viewer
- Calendar View:
- The viewer shows scheduled campaigns in weekly, daily, or monthly format, allowing for better organization.
- You can switch between different views using the “Month,” “Week,” “Day,” and “List” options at the top right.
- Customizable Time Zone:
- Users can adjust the reference time zone to ensure campaigns are sent at the right time for their audience.
- Details of Scheduled Campaigns:
- Each campaign appears on the calendar with its name, date, and time of delivery.
- If a campaign is scheduled for a specific time, it will be displayed in the corresponding time slot.
- Interaction with Campaigns:
- By clicking on a scheduled campaign, users can access more details, edit the scheduling, or even cancel the send if necessary.
- The interface allows users to adjust timings and make modifications without needing to create a new campaign.
- Create New Campaigns:
From the viewer, users can schedule new campaigns using the “+ New campaign” button, making planning easier from a single view.
Benefits of the Scheduled Campaign Viewer
✅ Efficient planning: Allows you to manage all campaigns from a single screen without manually checking each one.
✅ Avoids scheduling conflicts: Helps organize sends and avoid campaign overlaps during critical times.
✅ Ease of editing: Campaigns can be adjusted before sending in case of last-minute changes.
✅ Time optimization: Reduces operational workload by allowing structured scheduling of messages without constant manual intervention.
The scheduled campaign viewer in Spellty is a key tool for organizing, modifying, and monitoring all future campaigns, ensuring that communication with customers occurs at the right time and effectively.
Spellty Dashboard: Campaign Monitoring and Analysis
The Spellty dashboard provides a comprehensive and detailed view of your messaging campaign performance, enabling near real-time analysis and monitoring of key metrics. This tool is designed to optimize campaign management and facilitate tracking of sent, delivered, and read messages, as well as identifying any delivery error issues.
Key Metrics
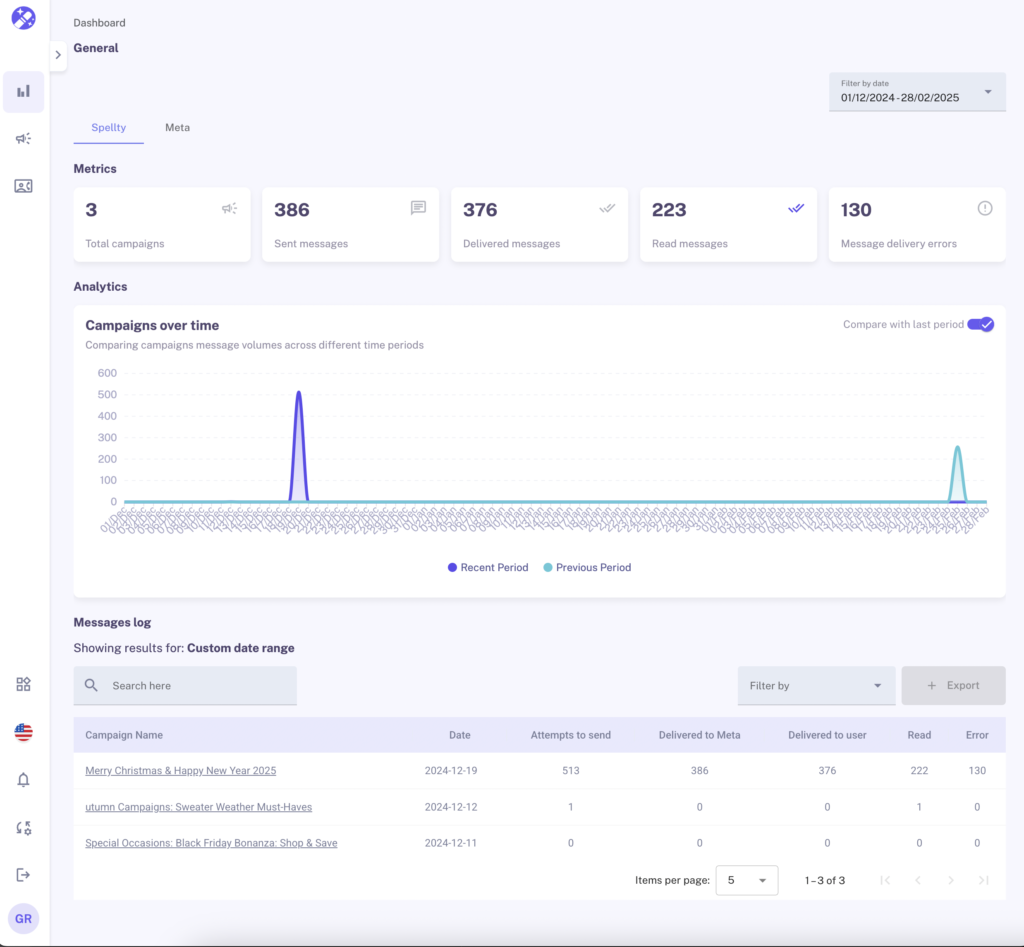
At the top of the dashboard, key campaign metrics are displayed, allowing you to quickly view the overall status of your sends:
- Messages Sent: Indicates the total number of messages attempted during the selected period.
- Messages Delivered: Shows how many messages were successfully delivered to recipients, which is crucial for evaluating the effectiveness of your sends.
- Messages Read: Reflects the number of messages opened by recipients, which is an important metric for measuring interaction and campaign impact.
Analysis Graph: Campaigns Over Time
The dashboard includes an interactive graph comparing the volumes of messages sent over two different periods:
- Recent Period (blue line) vs Previous Period (turquoise line).
- This graph is useful for visualizing trends in message volume, identifying unusual spikes or drops, and assessing the impact of campaigns over time.
Campaign Log
Below the metrics, the message log provides a detailed list of all campaigns carried out within the selected date range. This section shows the following details for each campaign:
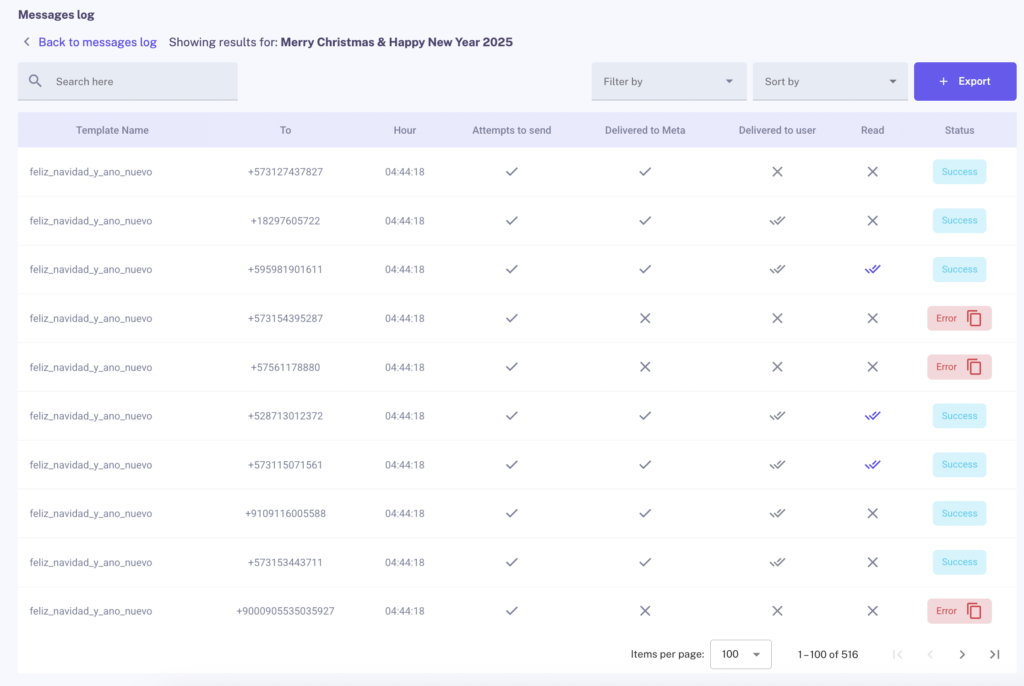
- Date: The day the campaign was executed.
- Send Attempts: The number of attempts made to send the messages.
- Delivered to Meta: The number of messages successfully delivered to Meta for processing.
- Delivered to User: The number of messages ultimately delivered to users.
- Messages Read: The number of messages opened by users.
Filter and Export Options
The dashboard offers several filtering options, allowing you to adjust results to a specific date range or other important variables for your analysis. Additionally, you can sort the data by different criteria and export the information for analysis outside the platform, making it easier to use in reports or presentations.